
VIEWS IN DATA DICTIONARY:
Views :
Each application has their own database tables. If you want to display the part of the data from each table then we fetch required data from each table and merge the data and display the data.
If is is a regular activity then it is better to create a View.
Views are logical databases.
View doesn't contains the data, at run time only view contains the data.
There are 4 types of Views;
1. Projection View
2. Database View
3. Help View
4. Maintenance View
Help View:
Help view fetch the data from left hand side table even though there in no match found in right hand side table. Help view is possible for only two database tables.
Help view is always used in selection method of elementary search help.
Steps to create Help view:
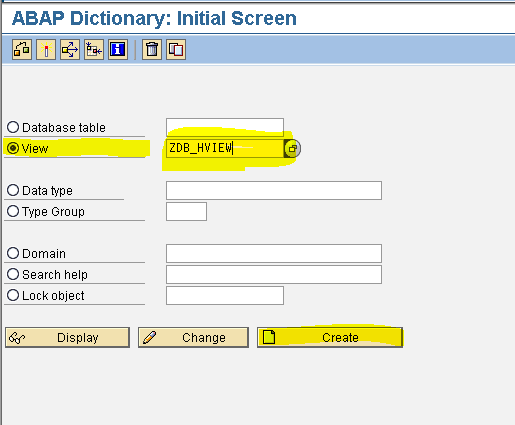
1. Execute SE11.
2. Select the radio button " View ".
3. Provide the view name ( Eg: ZDB_HVIEW ) and click on Create.
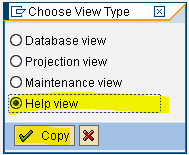
4. Select the radio button "Help view" and click on Copy.
5. Provide short description ( Eg: Help view for comp and cust ).
6. Provide the right hand side table ( Eg: KNB1 ) and click on Relationships button.

7. Select our required relationship checkbox and click on Copy.

8. Click on View Fields tab.

9. Click on Table fields button.

10. Select the each table and click on choose. Select the required fields from table and click on Copy.


11. Save, Check and Activate.
Note:
This Help view is used in selection method of elementary search help.
Steps to create elementary search help:
1. Execute SE11.
2. Select the radio button "Search help".
3. Provide the Search help name ( Eg: ZSH_VIEW ) and click on Create.

4. Select the radio button "elementary search help" and click on Enter.

5. Provide short description (Eg: Views in elementary search help).
6. Provide selection method as View name ( Eg: ZDB_HVIEW ) and provide Hot key ( Eg: A ).
7. Provide the search help parameters as below.

8. Save, Check and Activate.
Steps to attach the search help to Data element:
1. Execute SE11.
2. Select the radio button "Data type".
3. Provide the Data element name ( Eg: ZDE_HVIEW ) and click on Create.

4. Select the radio button " Data element " and click on Enter.
5. Provide short description ( Eg: DE for view in search help ).
6. Provide the domain name ( Eg: ZDM_HVIEW ) and double click on domain name. Click on Yes. Click on Yes.

7. Provide short description ( Eg: DM for view in search help ), data type ( Eg: CHAR ) and length ( Eg: 4 ).
8. Save, Check and Activate the domain. Click on back.

8. Click on Further characteristics tab.
9. Provide Search help name ( Eg: ZSH_VIEW ) and Parameters
( Eg: BUKRS ).
9. Save, Check and Activate the Data element.
PROGRAM:
*&---------------------------------------------------------------------*
*& Report ZHVIEW_SHELP
*&
*&---------------------------------------------------------------------*
REPORT ZHVIEW_SHELP.
PARAMETERS p_bukrs type zde_hview.
Output:

Maintenance View:
Maintenance view is used to update the data in the participated database tables. The participated tables must have primary key and foreign key relationship.
Based on the tables we create the maintenance view. Whenever we perform the insert, update and delete operations on the view then data will be updated in their respective database tables.
Working with Foreign Key Relationship:
Foreign key is a field in the table that is connected to another table via foreign key relationship.
This is used to validate the data being entered in one table ( Foreign key table ) by checking against list of possible values in another table ( Check table ).
Now Create the two tables as below.
Table : ZEMP_DETAILS
1. Execute SE11.
2. Select the radio button " Database table "
2. Provide the table name ( Eg: ZEMP_DETAILS ) and click on Create.

3. Provide short description ( Eg: Employee details ).
4. Provide delivery class ( Eg: A ) and data browser ( Eg: Display / Maintenance Allowed ) and click on Fields tab.

5. Provide field ( Eg: EMPID ) and data element ( Eg: ZDE_EMPID )

6. Double click on data element. Click on Yes. Save. Enter. Click on Yes.
7. Provide short description ( Eg: Employee Id ) and provide the domain name ( Eg: ZDM_EMPID ).

8. Double click on domain. Click on Yes. Save. Click on Yes.
9. Provide the short description ( Eg: Employee Id ), Data type ( Eg: CHAR ) and No. of Characters ( Eg: 10 ).

10. Save, Check and Activate the domain. Click on Back.
11. Save, Check and Activate the data element. Click on Back.
12. Similarly provide the other field details
( Field name : EMPNAME,
Data Element : ZDE_EMPNAME,
Domain : ZDM_EMPNAME,
Data type : CHAR,
No. of Characters : 20 ).
( Field name : EMPCITY,
Data Element : ZDE_EMPCITY,
Domain : ZDM_EMPCITY,
Data type : CHAR,
No. of Characters : 20 ).
13. Now the table is having the fields as below.

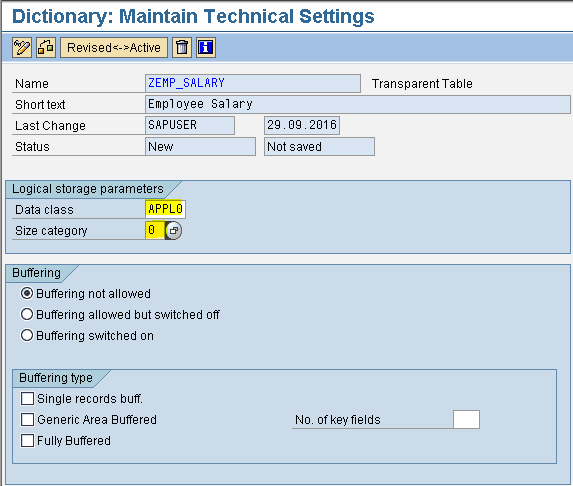
14. Click on Technical settings in the application tool bar.
15. Provide Data class ( Eg: APPL0 ) and Size category ( Eg: 0 ).

15. Save and Click on Back.
16. Save, Check and Activate the table.
17. Save the following data in the table.

Table : ZEMP_SALARY
1. Execute SE11.
2. Select the radio button " Database table ".
3. Provide the database table name ( Eg: ZEMP_SALARY ) and click on Create.

4. Provide short description ( Eg: Employee Salary ).
5. Provide Delivery class ( Eg: A ) and data browser ( Eg: Display / Maintenance Allowed ) and click on Fields tab.

6. Provide Field ( Eg: EMPID ) and Data element ( Eg: ZDE_EMPID ) and double click on data element. Click on Yes. Save. Enter.
( Note: The domain name of the link field in the both the tables should be same ).
7. Similarly for EMPSAL field provide the following details.
( Field name : EMPSAL
Data element : ZDE_EMPSAL
Domain : ZDM_EMPSAL
Data type : CURR ).
8. For currency field we need to provide the reference key field so, click on click on Currency/Quantity fields tab and provide the details as follows.

9. Now the fields in the table are as follows.

10. Click on Technical settings in the application tool bar and provide the Data class ( Eg: APPL0 ) and Size category ( Eg: 0 ).
11. Click on save. Click on back.
12. Select the field for which we want to provide the foreign key relationship ( Eg: EMPID ) and Click on Foreign keys ( Key symbol ) button.
13. Provide the check table name ( Eg: ZEMP_DETAILS ) and click on Generate proposal. It automatically establish the foreign key relation. Click on Copy.

14. Save, Check and Activate the table.
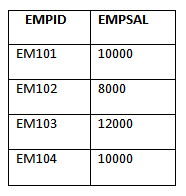
15. Save the following data in the table.
Steps to create Maintenance View:
1. Execute SE11.
2. Select the radio button " View ".
3. Provide the View name ( Eg: ZEM_VMAINTENANCE ) and click on Create.

4. Select the radio button " Maintenance view " and click on Copy.

5. Provide short description ( Eg: Employee Maintenance view ).
6. Provide the foreign key table name ( Eg: ZEMP_SALARY ) and click on Relationships button.

7. Now it display the all the available check tables of this table.
8. Select the Check box and click on Copy.

9. Click on View fields tab.
10. Click on Table fields.
11. Select the each table and select the required fields.
12. Now the view contains the following fields.

13. Save, Check and Activate.
14. In the menu bar click on Utilities. Select Table maintenance generator.

15. Select the Authorisation group ( Eg: &NC& ).
16. Select the Function group as maintenance view name ( Eg: ZEM_VMAINTENANCE ).
17. Select the one step maintenance type.
18. Provide the screen no ( Eg: 1111 ) and click on Create.

19. Save. Click on Back.
20. Activate the maintenance view.
Steps to maintain the data in Maintenance view:
1. Execute SM30.
2. Provide the table/view name ( Eg: ZEM_VMAINTENANCE ).
3. Click on Maintain. Enter.
4. Perform the insert, update, delete operations on the data.
Views :
Each application has their own database tables. If you want to display the part of the data from each table then we fetch required data from each table and merge the data and display the data.
If is is a regular activity then it is better to create a View.
Views are logical databases.
View doesn't contains the data, at run time only view contains the data.
There are 4 types of Views;
1. Projection View
2. Database View
3. Help View
4. Maintenance View
Help View:
Help view fetch the data from left hand side table even though there in no match found in right hand side table. Help view is possible for only two database tables.
Help view is always used in selection method of elementary search help.
Steps to create Help view:
1. Execute SE11.
2. Select the radio button " View ".
3. Provide the view name ( Eg: ZDB_HVIEW ) and click on Create.
4. Select the radio button "Help view" and click on Copy.

5. Provide short description ( Eg: Help view for comp and cust ).
6. Provide the right hand side table ( Eg: KNB1 ) and click on Relationships button.
7. Select our required relationship checkbox and click on Copy.
8. Click on View Fields tab.
9. Click on Table fields button.
10. Select the each table and click on choose. Select the required fields from table and click on Copy.
11. Save, Check and Activate.
Note:
This Help view is used in selection method of elementary search help.
Steps to create elementary search help:
1. Execute SE11.
2. Select the radio button "Search help".
3. Provide the Search help name ( Eg: ZSH_VIEW ) and click on Create.
4. Select the radio button "elementary search help" and click on Enter.
5. Provide short description (Eg: Views in elementary search help).
6. Provide selection method as View name ( Eg: ZDB_HVIEW ) and provide Hot key ( Eg: A ).
7. Provide the search help parameters as below.
8. Save, Check and Activate.
Steps to attach the search help to Data element:
1. Execute SE11.
2. Select the radio button "Data type".
3. Provide the Data element name ( Eg: ZDE_HVIEW ) and click on Create.
4. Select the radio button " Data element " and click on Enter.
5. Provide short description ( Eg: DE for view in search help ).
6. Provide the domain name ( Eg: ZDM_HVIEW ) and double click on domain name. Click on Yes. Click on Yes.
7. Provide short description ( Eg: DM for view in search help ), data type ( Eg: CHAR ) and length ( Eg: 4 ).
8. Save, Check and Activate the domain. Click on back.
8. Click on Further characteristics tab.
9. Provide Search help name ( Eg: ZSH_VIEW ) and Parameters
( Eg: BUKRS ).
9. Save, Check and Activate the Data element.
PROGRAM:
*&---------------------------------------------------------------------*
*& Report ZHVIEW_SHELP
*&
*&---------------------------------------------------------------------*
REPORT ZHVIEW_SHELP.
PARAMETERS p_bukrs type zde_hview.
Output:
Maintenance View:
Maintenance view is used to update the data in the participated database tables. The participated tables must have primary key and foreign key relationship.
Based on the tables we create the maintenance view. Whenever we perform the insert, update and delete operations on the view then data will be updated in their respective database tables.
Working with Foreign Key Relationship:
Foreign key is a field in the table that is connected to another table via foreign key relationship.
This is used to validate the data being entered in one table ( Foreign key table ) by checking against list of possible values in another table ( Check table ).
Now Create the two tables as below.
Table : ZEMP_DETAILS
1. Execute SE11.
2. Select the radio button " Database table "
2. Provide the table name ( Eg: ZEMP_DETAILS ) and click on Create.
3. Provide short description ( Eg: Employee details ).
4. Provide delivery class ( Eg: A ) and data browser ( Eg: Display / Maintenance Allowed ) and click on Fields tab.
5. Provide field ( Eg: EMPID ) and data element ( Eg: ZDE_EMPID )
6. Double click on data element. Click on Yes. Save. Enter. Click on Yes.
7. Provide short description ( Eg: Employee Id ) and provide the domain name ( Eg: ZDM_EMPID ).
8. Double click on domain. Click on Yes. Save. Click on Yes.
9. Provide the short description ( Eg: Employee Id ), Data type ( Eg: CHAR ) and No. of Characters ( Eg: 10 ).
10. Save, Check and Activate the domain. Click on Back.
11. Save, Check and Activate the data element. Click on Back.
12. Similarly provide the other field details
( Field name : EMPNAME,
Data Element : ZDE_EMPNAME,
Domain : ZDM_EMPNAME,
Data type : CHAR,
No. of Characters : 20 ).
( Field name : EMPCITY,
Data Element : ZDE_EMPCITY,
Domain : ZDM_EMPCITY,
Data type : CHAR,
No. of Characters : 20 ).
13. Now the table is having the fields as below.
14. Click on Technical settings in the application tool bar.
15. Provide Data class ( Eg: APPL0 ) and Size category ( Eg: 0 ).
15. Save and Click on Back.
16. Save, Check and Activate the table.
17. Save the following data in the table.
Table : ZEMP_SALARY
1. Execute SE11.
2. Select the radio button " Database table ".
3. Provide the database table name ( Eg: ZEMP_SALARY ) and click on Create.
4. Provide short description ( Eg: Employee Salary ).
5. Provide Delivery class ( Eg: A ) and data browser ( Eg: Display / Maintenance Allowed ) and click on Fields tab.
6. Provide Field ( Eg: EMPID ) and Data element ( Eg: ZDE_EMPID ) and double click on data element. Click on Yes. Save. Enter.
( Note: The domain name of the link field in the both the tables should be same ).
7. Similarly for EMPSAL field provide the following details.
( Field name : EMPSAL
Data element : ZDE_EMPSAL
Domain : ZDM_EMPSAL
Data type : CURR ).
8. For currency field we need to provide the reference key field so, click on click on Currency/Quantity fields tab and provide the details as follows.
9. Now the fields in the table are as follows.
10. Click on Technical settings in the application tool bar and provide the Data class ( Eg: APPL0 ) and Size category ( Eg: 0 ).
11. Click on save. Click on back.
12. Select the field for which we want to provide the foreign key relationship ( Eg: EMPID ) and Click on Foreign keys ( Key symbol ) button.
13. Provide the check table name ( Eg: ZEMP_DETAILS ) and click on Generate proposal. It automatically establish the foreign key relation. Click on Copy.
14. Save, Check and Activate the table.
15. Save the following data in the table.
1. Execute SE11.
2. Select the radio button " View ".
3. Provide the View name ( Eg: ZEM_VMAINTENANCE ) and click on Create.
4. Select the radio button " Maintenance view " and click on Copy.

5. Provide short description ( Eg: Employee Maintenance view ).
6. Provide the foreign key table name ( Eg: ZEMP_SALARY ) and click on Relationships button.
7. Now it display the all the available check tables of this table.
8. Select the Check box and click on Copy.
9. Click on View fields tab.
10. Click on Table fields.
11. Select the each table and select the required fields.
12. Now the view contains the following fields.
13. Save, Check and Activate.
14. In the menu bar click on Utilities. Select Table maintenance generator.
15. Select the Authorisation group ( Eg: &NC& ).
16. Select the Function group as maintenance view name ( Eg: ZEM_VMAINTENANCE ).
17. Select the one step maintenance type.
18. Provide the screen no ( Eg: 1111 ) and click on Create.
19. Save. Click on Back.
20. Activate the maintenance view.
Steps to maintain the data in Maintenance view:
1. Execute SM30.
2. Provide the table/view name ( Eg: ZEM_VMAINTENANCE ).
3. Click on Maintain. Enter.
4. Perform the insert, update, delete operations on the data.