Basics of SAP Script - Part 2


What are the components of SAP Script Form?
SAP Script Form is made of following coponents or subobjects

  1. Header
  2. Pages
  3. Windows
  4. Page Window
  5. Paragraph Formats
  6. Character Formats
  7. Documentation

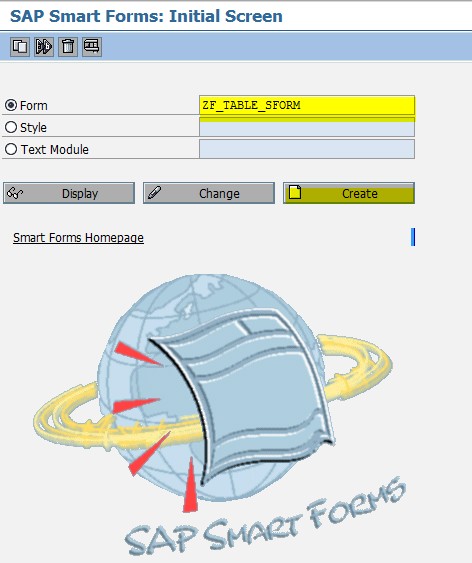
Goto Tcode SE71 to check subojects
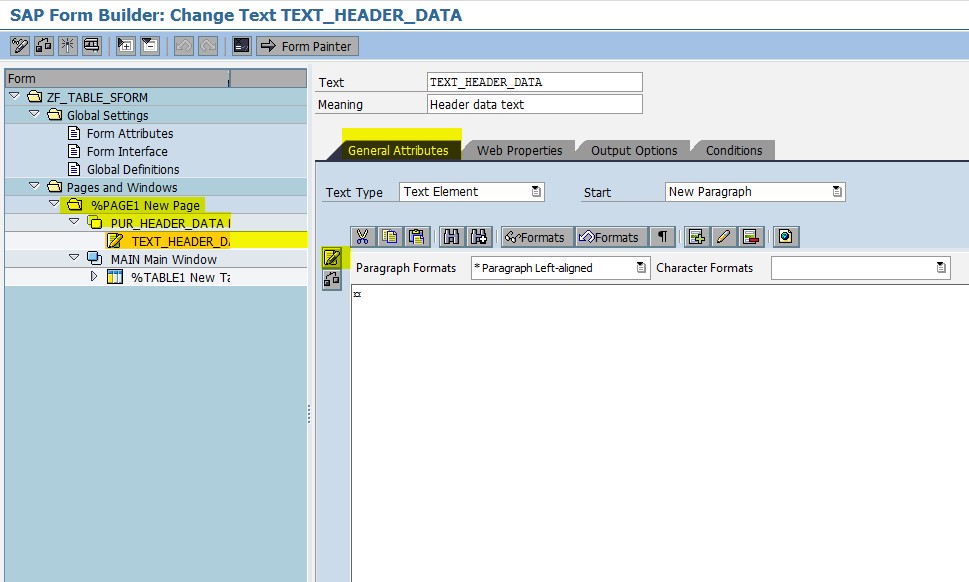

Header data - 
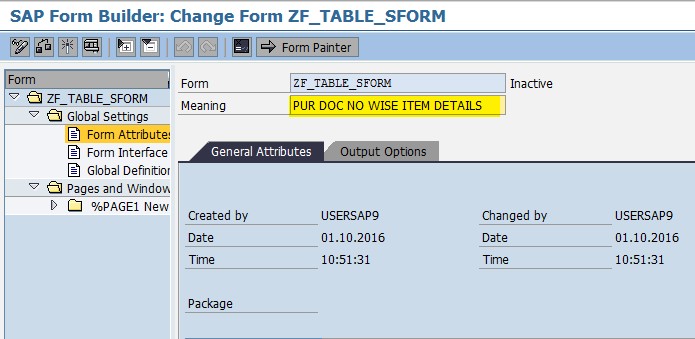
Header has 2 parts, Administrative data and Basic settings.
Administrative data to hold the Form name, Meaning, Package, Created by, Changed by and Language.
Basic settings consists of Page Setup like Page format, Orientation of Page, First Page of Form, default paragraph used, Font family and Font size.

Pages -
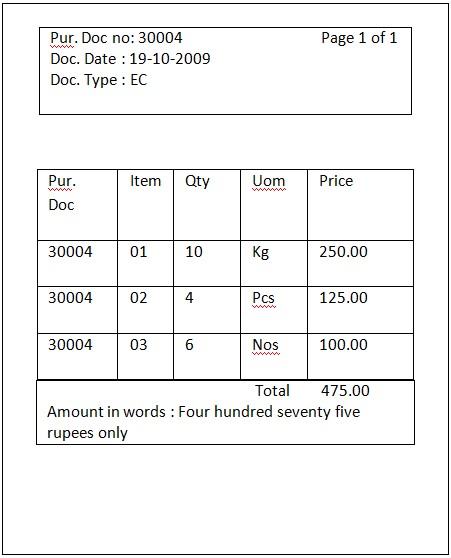
Pages define the layout of the form. You might have to create multiple pages to accommodate different layouts, if there is a requirement that the document will differ for subsequent pages. For example, the First page of the document will hold only the customer details like Name, Address, Contact and the Items purchased will be displayed from next page. Achieve this by creating multiple pages.
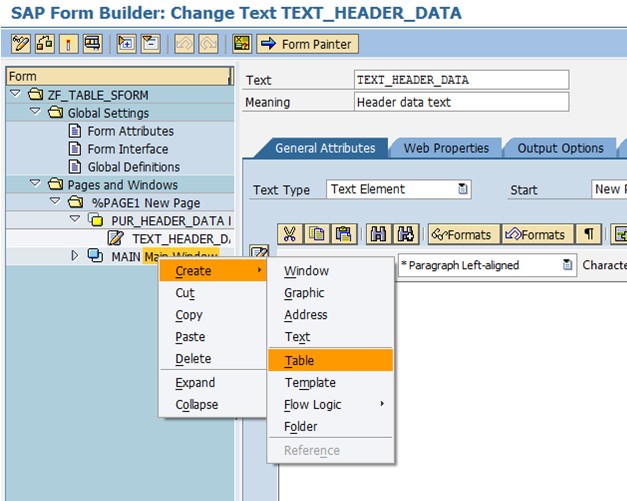
Windows -
Windows are positioned on pages. By changing the position of windows on page, you alter the layout of the page.
Window also does the job of holding related texts together. For example, you would to place all texts related to Address in one window.
A window can be placed on multiple pages, if your document has multiple pages.

Page window -
Page window defines the area that you want the window to occupy on the page and the coordinates at which the Window is placed on the Page. It calculates the coordinates from left and upper edge of Page.

Paragraph Formats
Defines the formatting of a paragraph.

Character Formats
Used to define the formatting of individual character or character strings within a paragraph.

Documentation
Used to maintain document related to a form.


Basics of SAP Script ( Getting Started ) - Part 1


Basics of SAP SCRIPT - Part 1

When dealing with forms in SAP, we have three options :
1. SAP Scripts
2. Smart Forms and more recently
3. SAP Adobe forms.

In this tutorial we will discuss the basics of SAP Script. You may refer the tutorials on SAP Scripts and SAP Adobe forms to know more about them.

Any business has to deal with various different types of print documents. The documents may belong to any business department and may change country wise as per the laws of different countries. Some common examples of print documents are Invoices, Sales Orders, Goods receipt, Payslips, etc. These might have to be printed in large numbers.

SAP Script is a tool to easily create or modify the layout of these forms as per the business requirement. SAP has provided standard Scripts for almost all different types of applications in business. An ABAPer job might be to change the existing layout or create a new layout along with its driver program as per the business requirement.

Driver program is also know as print program and is responsible to fetch and provide data to the form for print.

What is the Tocde to work with SAPScript?
Tocde for SAP Script is SE71

Components of SAP Script
SAP Script has two components
1. Form layout
2. Print or driver program


WORKING WITH TABLES IN SMARTFORMS

WORKING WITH TABLES IN SMARTFORMS:

Tables are used to print the data in tabular format. Table contains three sections.

                 1. Header
                 2. Main area
                 3. Footer

Based on the given purchasing document number, display the purchase order details as below.


1. Execute transaction 'SMARTFORMS'.
2. provide the smartform name ( Eg: ZF_TABLE_SFORM ) and click on create.


3. Provide short description and double click on 'Form Interface' in the left panel.


4. In the import tab provide the following details ( Input variable and data work area which are coming from print program. Here I created one global workarea with the following fields ).


5. In the Tables tab provide the following details ( In this internal table is declared with table type ( ZT_PUR_ITEM ) why bcz whenever the internal table data is coming from print program we need one table type ( global table type ). We can use pre-defined global table type with our required fields ( Eg: /SAPSLL/EKPO_R3_T ) or customized table type with our required fields ).


6. Now double click on Global definitions tab in the left panel and provide the details as below ( This is a local work area to loop the internal table data which is coming from print program ).


7. Now click on Types tab and declare the types as follows.


8. Now click on Currency/ Quantity fields tab and provide the details as below. ( Whenever we are working with currency and quantity fields we must provide the reference fields )


9. All the declarations are completed now we are going to design the layout.
10. Expand the Pages and widows and select the page. Right click on the page. Create. Window. ( To print the header text and page numbers )


11. Provide window name ( Eg: PUR_HEADER_DATA ) and meaning ( Eg: Header data and page no ).


12. Select the header window and right click . Create . Text.


13. Provide the text name ( Eg: Text_header_data ) and meaning ( Eg: header data text ).


14. Now select the main window. Create. Table.


15. Now select the line type ( Eg: LTYPE1 ) right click and select the rename line ( Eg: LINE1 ).


16. Select the line ( Eg: LINE1 ). Right click. Select insert. Select Empty line underneath to create a new line and rename the line as ( Eg: LINE2 ).


17. Now the window is as below.


18. Select the LINE1 and click on Details button to divide the line.


19. Here LINE1 is used for Main window ( Header and Main area bcz these two are similar in structure ) and LINE2  is used for Main window ( Footer ).
20. Click on Table painter. Now the lines structure becomes like this.


21. Now double click on Main window header. Right click. Create. Select Table line.


22. Select line type as LINE1 and window becomes like this.


23. Follow steps 21 and 22 for Main window main area to select line type as LINE1 and for footer select line type as LINE2.
24. Now the screen is as below.


25. Now select the each cell. Right click. Create. Text. ( To print the data in the window ). Name them according to field text and field value to understand who will going to work on this smartform.


26. After creating the texts the screen becomes like this.


27. Now double click on Table and click on data tab and provide the details as follows.


27. Now in the right hand set layout according to your design by drag and drop. If it is not visible Click on form painter in the application tool bar and adjust the layout design as below.


28. Save, Check and Activate the program.


Develop the print program

*&---------------------------------------------------------------------*
*& Report  ZP_PUR_PRINT_PROGRAM
*&
*&---------------------------------------------------------------------*
*&
*&
*&---------------------------------------------------------------------*
REPORT zp_pur_print_program.
PARAMETERS : p_ebeln TYPE ekko-ebeln.
DATA fm TYPE rs38l_fnam.
*work area for header data
DATA BEGIN OF LS_EKKO.

INCLUDE STRUCTURE ZST_PUR_HEA.
DATA END OF LS_EKKO.
*work area and internal table for item data
data begin of ls_ekpo.
include STRUCTURE ztpuritem.
data end of ls_ekpo.
data lt_ekpo like table of ls_ekpo.
*Fetching header and item data.
SELECT SINGLE ebeln
              bsart
              aedat
              
FROM ekko
              
INTO ls_ekko
              
WHERE ebeln p_ebeln.
if ls_ekko is not initial.
SELECT ebeln
       ebelp
       menge
       meins
       netpr
       
FROM ekpo
       
INTO TABLE lt_ekpo
       
WHERE ebeln ls_ekko-ebeln.

  
endif.
*Calling the smartform
CALL FUNCTION 'SSF_FUNCTION_MODULE_NAME'
  
EXPORTING
    formname                 
'ZF_TABLE_SFORM'
*   VARIANT                  = ' '
*   DIRECT_CALL              = ' '
 
IMPORTING
   FM_NAME                  
FM* EXCEPTIONS
*   NO_FORM                  = 1
*   NO_FUNCTION_MODULE       = 2
*   OTHERS                   = 3
          
.
IF sy-subrc <> 0.
* Implement suitable error handling here
ENDIF.
*Exporting data to smartforam
  
CALL FUNCTION FM
    
EXPORTING
*     ARCHIVE_INDEX              =
*     ARCHIVE_INDEX_TAB          =
*     ARCHIVE_PARAMETERS         =
*     CONTROL_PARAMETERS         =
*     MAIL_APPL_OBJ              =
*     MAIL_RECIPIENT             =
*     MAIL_SENDER                =
*     OUTPUT_OPTIONS             =
*     USER_SETTINGS              = 'X'
      i_ebeln                    
P_EBELN
      ls_ekko                    
LS_EKKO*   IMPORTING
*     DOCUMENT_OUTPUT_INFO       =
*     JOB_OUTPUT_INFO            =
*     JOB_OUTPUT_OPTIONS         =
    
TABLES
      lt_ekpo                    
LT_EKPO*   EXCEPTIONS
*     FORMATTING_ERROR           = 1
*     INTERNAL_ERROR             = 2
*     SEND_ERROR                 = 3
*     USER_CANCELED              = 4
*     OTHERS                     = 5
            
.
  
IF sy-subrc <> 0.
* Implement suitable error handling here
  
ENDIF.


Now execute the print program 

Provide input.
Provide output device ( Eg: LP01 ) and click on print preview.
It will display the empty layout why bcz we are not written code in the smartform to print.


Now go to smartform and write the code in the text editor to print the data.

1. Open the smartform in change mode.
2. Expand the page. Expand header window and double click on text.


ENHANCEMENT POINTS - EXPLICIT ENHANCEMENT

ENHANCEMENT POINTS

Enhancement points are nothing but empty places / empty slots where we can add our code to extend the standard SAP software.

These are not SUB-ROUTINE / FUNCTIONS / METHODS , But these are a ENHANCEMENT POINTS (New technology).

EXPLICIT ENHANCEMENT

Explicit Enhancement are of 2 types.

1. Enhancement Point : Here we can add additinal functionality to our program, and then our program executes with enhanced function.

2. Enhancement Section : Here our program wont be executed , the enhanced program will execute.

EXAMPLE

This Custom programs displays the output with no headings.Now we will create a EXPLICIT ENHANCEMENT POINT with header information.

BEFORE ENHANCEMENT :


OUTPUT:


Now we will work on EXPLICIT ENHANCEMENT.

STEP 1

Place the cursor where we need to create ENHANCEMENT POINT.

Just right Click On it.


Now provide ENHANCEMENT POINT NAME.

Select the radio button CODE.

Provide the ENHANCEMENT SPOT name as below.


Click on Continue.

ENHANCEMENT POINT will be created in our program.


Now click on the ENHANCE icon .


Now Right on our enhancement point and choose enhancement -> create.


Provide the ENHANCEMENT IMPLEMENTATION name as below.


Click on Continue.

Now write the logic.


ACTIVATE the ENHANCEMENT.

Now the OUTPUT will be:


HEN

IDOC'S

IDOC'S

Intermediate Documents.

It is an intermediate document which contains the data.

Technically,idoc is nothing but group of segments.

Each segment contains group of fields.

Segments are like Structure.

All Pre-defined segments start with E1.

All new segments (what we create) will start with Z1 / Y1.

EXAMPLE ON STANDARD SAP IDOC

MATMAS05 IS A IDOC FOR MATERIAL MASTER DATA.

MATMAS05 CONTAINS COLLECTION OF SEGMENTS AS
                                                                                                          E1 MARAM
                                                                                                       
                                                                                                           E1 MAKTM

THIS SEGMENT E1 MARAM CONTAINS FIELDS AS
 
                                                                                              MATNR
   
                                                                                              MBRSH

                                                                                               MTART

THIS SEGMENT E1 MAKTM CONTAINS FIELDS AS

                                                                                               SPRAS

                                                                                               MAKTX


NOTE

05,04,03 are the versions of IDOC.

IDOC'S are ASYNCHRONOUS.

COMMIT AND UNWAIT.

TCODE for IDOC CREATION is WE30.

TCODE for SEGMENT CREATION is WE31.


MESSAGE TYPE:

It specifies the type of application from which IDOC'S are being used.

The application may be material master or  customer master or vendor master.

Always an IDOC type and MESSAGE TYPE should be linked with each other.

TCODE for MESSAGE TYPE WE81.

Assigning the MESSAGE TYPE to IDOC by TCODE WE82.

EXAMPLE

MATMAS is a MESSAGE TYPE.

It contains collection of IDOC'S.

Under MATMAS MESSAGE TYPE a list of IDOC'S will be available.

1. MATMAS05

2. MATMAS04

3. MATMAS03.


ALE - IDOC'S

ALE Means APPLICATION LINK ENABLING.

ALE is a technology which is used to communicate between the servers available at different locations.

These are used to send / receive data between SAP to SAP servers.

EDI

EDI - ELECTRONIC DATA INTERCHANGE

It is used to transfer the data from SAP to NON-SAP System.


SAP SYSTEM transfer the data in the format of IDOC's.

SAP SYSTEM receives the data in the format of IDOC'S.


In EDI there will be a MIDDLE WARE software to interchange the data from SAP SYSTEM to NON-SAP SYSTEM.

RUN TIME COMPONENTS OF IDOC

There will be 3 components while transmitting IDOC.

1. CONTROL RECORD

It contains details of SENDER,RECEIVER,PORT,TIME,DATE,IDOC NAME ,MESSAGE TYPE NAME.

This data is stored in EDIDC table.

2. DATA RECORD

Contains our actual data to be transmitted in the form of segments (fields).

This data is stored in EDIDD Table.

3. STATUS RECORD

Contain status messages of IDOC.

i.e   51 status means    =  IDOC IS ERROR.

       53 status means     = IDOC IS SUCCESSFUl.

Data is stored in EDIDS Table.


WE02 or WE05 are the TCODES for IDOC LIST.


CONFIGURATION SETTINGS FOR IDOC

1. DEFINE LOGICAL SYSTEM.

2. ASSIGN / LINK CLIENT N0 TO LOGICAL SYSTEm.

3. CREATE RFC DESTINATION.

4. DEFINE PORT

5. DEFINE PATTERN PROFILE.

6. DEFINE DISTRIBUTION MODEL

7. FINALLY RUN THE TCODE or OUTBOUND PROGRAM.

These steps should be done for SENDER SYSTEM as well as RECEIVER SYSTEM.

STEP 1 to STEP 4 are done by BASIS TEAM.

The remaining we have to do.


1. DEFINE LOGICAL SYSTEM:

In this need to define a logical name for sender and receiver systems

TCODE = BD54 / SALE

2. ASSIGN / LINK CLIENT NUMBER TO LS

Need to specify the CLIENT NUMBER for sender and receiver to transfer particular client data.

TCODE = SALE.

3. RFC CONNECTION

Establishing a connection / link between sender and receiver system.

TCODE  = SM59.

4. DEFINE PORT

Port specifies the medium of transferring the data from sender to receiver system.

TCODE = WE21.

5. PATNER PROFILE

It specifies information about 
                                               
                                               (i)  WHOM TO SEND

                                                (ii) WHAT TO SEND

                                                 (iii) HOW TO SEND

                                                 (iv) WHEN TO SEND

                                                  (v) PROCESS CODE

WHOM TO SEND:

Receiver Partner  LOGICAL SYSTEM name.

WHAT TO SEND:

1. MESSAGE TYPE

2. IDOC TYPE

HOW TO SEND

via port name

WHEN TO SEND:

Immediate

or

Collect and send

PROCESS CODE:

Nothing but a function module is used to post the data in receiver system.

TCODE = WE20

6 . DISTRIBUTION MODEL

It Specifies the filters so, that the unwanted data / IDOC can be stopped.

TCODE = BD64.


TRANSMITTING MATERIAL MASTER DATA FROM SENDER (800) TO RECEIVER (810) SYSTEM

WE NEED TO SETTINGS FOR SENDER SYSTEM AS WELL AS RECEIVER SYSTEM


STEP 1

(SENDER SYSTEM 800 CLIENT)

1. DEFINE LOGICAL SYSTEM

Go to Tcode  BD54.


Click on New entries.

Enter Logical system name and description as below.


S
Click on SAVE.

(RECEIVER SYSTEM 810 CLIENT)


NOTE:  IF WE HAVE ANY AUTHORISATION PROBLEMS IN CREATING LOGICAL SYSTEM AND ASSIGNING CLIENT NUMBER TO LOGICAL SYSTEM IN 810 SYSTEM. SO WE CAN ASSIGN LOGICAL SYSTEM NAME , CLIENT NUMBER TO LOGICAL SYSTEM IN 800 SYSTEM.


Go to TCODE BD54.

Click on NEW ENTRIES.

Provide the logical system name for 810 as below.


Click on SAVE.

STEP 2

ASSIGNING CLIENT NUMBER TO LOGICAL SYSTEM

(SENDER 800 SYSTEM)

Go to TCODE SCC4

Click on CHANGE ICON.


Now double click on 800 CLIENT

Provide the LOGICAL SYSTEM NAME.


SAVE


(RECEIVER SYSTEM 810 CLIENT)


Go to TCODE SCC4

Click on CHANGE ICON.


Double click on 810 CLIENT and provide the RECEIVER logical system name.


SAVE

STEP 3

CREATING RFC CONNECTION 

(800 client)

Go to TCODE SM59.

Click on ABAP CONNECTION FOLDER.


Provide a name.

select TARGET HOST in TECHNICAL SETTINGS TAB

Click on LOGON & SECURITY.

Give details.


Click on save.

Click on REMOTE LOGON icon to test.

we will move to 810 system.


STEP 4

DEFINE PORT

Go to Tcode  WE21

Select TRANSACTION RFC.

Click on CREATE icon.


Select OWN PORT option.

Provide a name.


Then click on continue.

provide description and RFC NAME what we created in sm59.


Click on save.

STEP 5

PARTNER   PROFILE

MAINTAIN OUTBOUND PARTNER PROFILE.

(800 SYSTEM)

Go to TCODE WE20.

Click on PARTNER TYPE LOGIC SYSTEM.

Click on create icon.


Now provide our 810 Logical name as below.


Click on SAVE.

Then create OUTBOUND PARAMETER by clicking on below icon.


SPECIFY THE BELOW DETAILS AS BELOW.


Click on SAVE.

(810 system)

Go to TCODE WE20.

Click on PARTNER TYPE LOGIC SYSTEM.


Click on create icon.


Provide our 800 logical system name.


Click on save.

Then Create INBOUND PARAMETERS BY CLICKING BELOW ICON.


Specify the below details.


Click on SAVE.

STEP 6

DEFINE DISTRIBUTION MODEL

(800 system).

Go to TCODE BD64.

Click on DISPLAY <-> CHANGE.


Click on CREATE MODEL VIEW.


Provide SHORT TEXT and TECHNICAL NAME.


Click on CONTINUE.

It will be present at the BOTTOM.

Just select it.

Click on CREATE BUTTON  ADD MESSAGE TYPE .


Provide the sender and receiver and message type name as below


Click on SAVE.

STEP 7

RUN THE OUTBOUND PROGRAM / TCODE.

GO TO BD10 (MATERIAL MASTER DATA) TCODE.


GIVE SOME MATERIAL NUMBER. ( I JUST CREATED A MATERIAL IN MM01)

PROVIDE MESSAGE TYPE.

LOGICAL SYSTEM NAME = RECEIVER NAME.

SELECT THE CHECK BOX SEND MATERIAL IN FULL.


CLICK ON EXECUTE.

WE WILL GET 1 INFO MESSAGE AS MASTER IDOC.


CLICK ON CONTINUE.

WE WILL GET ONE MORE MESSAGE AS COMMUNICATION IDOC.


TESTING


GO TO 810 SYSTEM.

GO TO TCODE WE02.


 EXECUTE.

OUR MATERIAL HAS BEEN TRANSMITTED TO 810.


GREEN COLOUR AND STATUS NUMBER 53 INDICATES SUCCESSFUL.

JUST DOUBLE CLICK ON IT.
EXPAND DATA RECORD AND DOUBLE CLICK ON OUR SEGMENT E1 MARAM.

TO TEST MORE.

GO TO 810 SYSTEM.

GO TO MM03 TCODE  GIVE OUR MATERIAL NUMBER OR SE11 TCODE AND GIVE TABLE NAME AS MARA

GIVE OUR MATERIAL NUMBER.


IDOC'S FILTER:

Filtering the unwanted IDOC'S and transmitting the required IDOC'S is called IDOC FILTERING.

Filter value's are maintained at TCODE BD64.

EXAMPLE ON FILTERING ALL MATERIAL TYPES AND TRANSMITTING ONLY FERT MATERIAL TYPE.

We need to work on DEFINE DISTRIBUTION MODEL Step 6. from the above EXAMPLE.

(800 system)

Go to TCODE BD64.

Click on CHANGE.


Select our MODEL VIEW WHAT WE CREATED.


Expand our MODEL VIEW WHAT WE CREATED RECENTLY.


Double Click on NO FILTER SET anClick on CREATE FILTER GROUP.


NOW expand DATA FILTER -> FILTER GROUP .


DOUBLE CLICK ON MATERIAL TYPE.

CLICK ON '+' ICON.


GIVE VALUE AS "FERT".


Click on continue.

Click on SAVE.

Our FILTERS will be ACTIVE.

Testing

Create 5 material type of RAW MATERIAL and 3 material type as FERT.

material no test 1 to test 5 are of Material type RAW MATERIAL.

material mo test 6 to test 8 are of Material type FINISHED PRODUCT.

Now go to TCODE BD10 (material master data).

Provide the material no from test 1 to test 8 as below.


Click on EXECUTE.


We will get info of  8 master idoc at sender side.


Click on continue.

We will get info of 3 communication idocs at receiver side.


Communication IDOC will be generated at receiver side.

Means our fert material type has been transmitted successfuly.

Go to Tcode WE02 in 810 SYSTEM.

Click on execute.


3 FERT MATERIAL TYPE HAS BEEN RECEIVED.

53 status indicates SUCCESS.

Double click on them to view.

or

You can check in MARA TABLE By giving our mat no TEST 6 to TEST 8 (810 system).


SEGMENT FILTER


Stopping / Filtering the Particular Segment is called SEGMENT FILTER.

BD56 is the Tcode for Segment Filter.

Unwanted SEGMENT should Specify in BD56 , So that they can be filtered.

EXAMPLE IS TO FILTER E1 MARMM SEGMENT FROM MATMAS05 IDOC.


(800 system)

Go to Tcode BD56.

Provide the MESSAGE TYPE as below.


Press Enter.

Click on NEW ENTRIES and Provide the details as below.


Click on SAVE.

TESTING

Now go to Tcode BD10 (MATERIAL MASTER DATA).

Am giving MATERIAL N0 what we created recently.  test8 - mat no


 click on EXECUTE.

we will get MASTER IDOC info.


Click on CONTINUE.

We will get 1 Communication idoc info.


Go to 810 System.

give Tcode as WE02.

Select our IDOC.


Double click on our Idoc.


Expand DATA RECORD.


Here we wont see our SEGMENT E1MARMM because it has been filtered.


CUSTOM IDOC'S

Custom Idoc's   = New Idoc's  (what we create).

Always we create NEW IDOC'S in 2 ways.

1.  EXTENDED IDOC.

2. REDUCED IDOC.

EXTENDED IDOC

Standard Idoc + New segment.

Similar to APPEND Statement.

REDUCED IDOC

Standard Idoc  - Removing Existing Segment.

EXAMPLE

Lets add a new segment Z1KNA1 with 2 fields like ZZMCD04 and ZZMCD05 to standard SAP IDOC  DEBMAS06.

Created Segments are indicated by Z1 / Y1.

Standard Segments as E1.

Step 1

Go to Tcode we31  (SEGMENT CREATION).

Provide a name .


Click on CREATE.

Provide the details as below.


SAVE.


BACK.

Click on EDIT -> SET RELEASE.


When we released it we will get a TICKED CHECK BOX as below.


STEP 2

Go to Tcode WE30 (Idoc creation).

Copy the standard idoc to ZZDEBMAS06.


Click on CREATE.

Provide the details.


Now place the cursor on 1st segment.

Click on Create.


Here provide the details as below.

Give our SEGMENT NAME.


Press Enter.

SAVE.


SAVE.

BACK.

Click on EDIT -> SET RELEASE.


Click on YES.


REDUCED IDOC'S

Removing the segments from standard idoc.

TCODE BD53.

Provide a NAME and click on CREATE.


Provide the MESSAGE TYPE REFERENCE.


Press ENTER.

Provide some description as below.


Click on CONTINUE.

Select E1MARA1 and click on SELECT Button.


And now it turns into WHITE COLOUR as below.


Double Click on our segment.

Select any field and click on SELECT.


The field turned into white color as below.

Enter.

SAVE.


EXAMPLE ON EXTENDED IDOC SCENARIO.

Lets add 2 Custom fields to Standard SAP IDOC DEBMAS06 and transmit the data to receiver system.

STEP 1

Same as previous example.

Go to Tcode WE31.

Create a SEGMENT with 2 Fields.

Release the segment also .


STEP 2

Same as previous example 

Create  Extended IDOC ZZDEBMAS06_I by linking standard IDOC DEBMAS06.

Add our segement = Z1KNA1M.

Release our IDOC also.


STEP 3

Link our Extended IDOC and BASIC IDOC to  MESSAGE type.

Tcode is WE82.

Click on EDIT.

Click on NEW ENTRIES.

Provide the details as below.


Click on SAVE.

STEP 4

Maintain Partner Profile

(800 SYSTEM)

Tcode WE20.

Click on '+' Icon at outbound parameters.

provide the details as below.


SAVE IT.

(810 system)

Click on '+' icon at INBOUND parameters .

Provide the details as below.


Click on SAVE.

STEP 5

( 800 system )

DEFINE DISTRIBUTION MODEL.

Go to tcode BD64.

Click on edit option and Click on Create Model View.


Provide the details as below.


Click on Continue.


 Now Our model view will be available at the bottom.

 Place the cursor on our model view and click on   ADD MESSAGE TYPE.


Provide the sender ,receiver and message type details.

click on continue.

Finally it looks like.


Click on SAVE.

STEP 6

Write the Piece of ABAP LOGIC for the new fields using ENHANCEMENTS.

Need to find enhancement for BD12 Tcode (Customer master data).


Go to TCODE SE93.

Give Tcode as BD12.


Click on DISPLAY.

Note down the Package Name.


Go to TCODE SMOD.

Click on Find button.

Provide the PACKAGE NAME.


Click on Execute Button.


Note down the ENHANCEMENT NAME.

Go to SMOD tcode.

Provide that enhancement number.

BUT INSTEAD OF LAST NUMBER '3' PLACE  *.


Click on HELP BUTTON.

we will get more exit names as below


As per requirement VSV00001 suits for us.

Double click on it to view .

we have 4 Function Modules.


EXIT_SAPLVV01_001 will work .

Just double click on it.

And view the import and export parameters.

To write the logic go to EXIT_SAPLVV01_001 function module.

Double click on INCLUDE TO WRITE THE LOGIC.

Before writing the logic Create a project for it.

Go to Tcode CMOD.

Give a name .


Click on Create.

Provide some description .


Click on ENHANCEMENT ASSIGNMENTS.

Provide the enhancement name.


Click on Components and activate it.


Double click on this EXIT_SAPLVV01_001.

Double click on INCLUDE.


And the logic will be.


TESTING:

Create a CUSTOMER using TCODE XD01.

Customer no = 888.


Go to TCODE BD12 (Customer master data)


Give c no as 888 ,receiver system and message type as below.


We will get MASTER and COMMUNICATION IDOC's .


Now go to TCODE WE02 in 810 SYSTEM.

Click on EXECUTE ICON.


Double click our idoc.


Expand DATA RECORD.


Now we can see our Segment what we created Z1KNA1M.

And the fields ZZTELFX2 and ZZTELFX3 with OUTPUT.

And our IDOC EXTENSION : ZZDEBMAS06_I.


RE-PROCESSING  IDOC:

TCODE IS BD87.

RE-PROCESSING IS ALWAYS DONE AT RECEIVER SYSTEM.

Go to Tcode BD87.

provide ERROR idoc number.


Click on execute.

Expand RECEIVER TAB.

Select the RED COLOUR ICON .

RIGHT CLICK ON IT and Select PROCESS.


It will RE_PROCESS the IDOC ,without changing the IDOC NUMBER.

EXAMPLE ON TRANSFERRING THE TRANSACTION DATA 

FIRST TO FOUR STEPS ARE SAME.

WE NEED TO WORK ON STEP 5 (PATTERN PROFILE)

(800 SYSTEM)

STEP 5

TCODE = WE20

 Select  PARTNER TYPE LS LOGICAL SYSTEM.


Expand PARTNER TYPE LS LOGICAL SYSTEM.

And select our Partner system.   Z810_RECVR.

And click on "+" Icon to add OUTBOUND PARAMETERS.


Now add the MESSAGE TYPE as "ORDERS".

Provide the DETAILS as Below.


Click on SAVE.

(810 system)

Go to TCODE WE20 .

 Select  PARTNER TYPE LS LOGICAL SYSTEM.


Expand PARTNER TYPE LS LOGICAL SYSTEM.

And select our Partner system.   Z810_SEND.


And click on "+" Icon to add INBOUND PARAMETERS.


Provide the Details as below.


STEP 6

Maintain Distribution Model

(800 system)

Go to Tcode BD64.

Click on EDIT option and Choose CREATE MODEL VIEW .


Provide the details.


Click on Continue.

Now select our model view and Click on ADD MESSAGE TYPE .

Provide the details.


It will appear like this.


Click on SAVE.

STEP 7

(800 system)

For Transaction DATA we need to do some Settings.

Need to Tcode NACE.

Select EF (PURCHASE ORDER).


Click on OUTPUT TYPES.

Select the required OUTPUT TYPE for purchase order as below.


Now Double Click on PROCESSING ROUTINES.


And see Whether ALE is Configured or not.

COME BACK.

COME BACK.

Select EF (PURCHASE ORDER) .


Click on CONDITION RECORD.


Double click on NEU (NEW PO PRINT OUT).


Select the 1st option.

Click on Continue.

Provide the details as below.


Click on EXECUTE.

Enter the data.


Enter.

Save.

Now we need maintain MESSAGE CONTROL that is nothing  but FUNCTIONAL SETTING in WE20 OUTBOUND PROFILE in 800.

Go to Tcode WE20.

Select our LOGICAL SYSTEM name Z810_recvr.


Double click on ORDERS.


Open the MESSAGE CONTROL TAB.


Click on INSERT ROW icon.

And provide the details as below.


Click on SAVE.

Back.

TESTING:

Go to Tcode ME21N.

Provide vendor as 1000.

Hit enter.

Give Purchase organisation as  1000.

Purchase Group as 000.

Company Code as 1000.

Press Enter.

Now provide the ITEM DETAILS.

Item as 11.

Material as 100-100.

Quantity as 10.

Plant as 1000.

Press enter.

IF error comes we need give data in NET PRICE Field.

Finally it looks like the below snapshot.


Click on save.

Click on PURCHASE ORDER -> OTHER PURCHASE ORDER.


We will get a Screen as below.


Press ENTER.

click on MESSAGES Tab as below.


Then our STATUS will be shown.

GREEN COLOUR INDICATES "SUCCESS".

RED COLOUR INDICATES "ERROR".


For more info.

Select our OUTPUT TYPE and click on PROCESSING LOG.


Details will be shown Clearly.